Pages

Tuesday, January 29, 2013

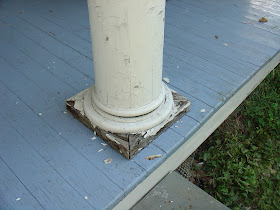
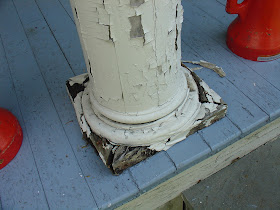
Porch Column Bases DONE!!!, that is, 8: Before and After.

I want to try to do a before and after post, which I haven't attempted yet, in this baby blog of mine. So bear with me if it seems too long and boring. I'll try to rely on photos only, but I have to hunt them up. This is the last in in the series. For the whole story and detailed info, see posts 1-7 titled Porch Column Bases. The first in the series is here. The latest in the series is here. They're all tagged with the label "Replace Porch Column Base Series," which you can find along the right-hand side of the main blog page. So here goes ...

Two before shots of the whole porch:


Then some close-ups of the four middle column bases we replaced.

Column Two Before:


Column Two After:


Column Three Before:


Column Three After:


Column Four Before:


Column Four After:


And Column Five Before -- the worst one:


Column Five After, hard to believe:


And last, a few after shots of the whole porch:


And very last, all lit up for the holidays!


Sunday, January 27, 2013

Kitten anyone? Phantom comes to Pugsley.

This will be short. The same weekend of Hurricane Sandy, at the end of October, we were stocking up on (human) water and (cat) food, in advance of the storm, and what do you know it, a new little kitten found us, a rescue up for adoption at our local Petco, through the non-profit rescue operation, Cat Assistance.

He's a somewhat unusual breed with interesting markings, called a Snowshoe, which is a cross between the ubiquitous American Shorthair and a Siamese.

He's a dear, and a good match for our resident cat, Minky, in spunkiness and sheer ferocity, well, except, that is, when he becomes a total kitten monster and tries to terrorize her. As of this writing in January they still aren't quite getting along--yet, I say to myself, and perhaps I will write a few posts about my many (desperate) attempts to get them to make friends. In any case, here are a couple of shots, from the weekend of the hurricane that blew Phantom in, to live at Pugsley.

Oh, and while you're at it, you can lay your eyes on two more projects that our having (almost) finished the bathroom renovation created:  the need to lay carpet on the front stairs and the need to take up carpet in the upstairs hall. Add them to the list!


Friday, January 25, 2013

Welcome to my world: Bathroom Renovation Project 27

We are nearly finished, truly. If you have not been following, the beginning of this project can be found here, the day the bathtub arrived. If you have been following and need a refresher, the last post on the bathroom renovation is here.

Nearly everything is painted, except the plaster walls and ceiling. It's a room again.


A bathroom, even. With a sink ...


A toilet ...


And a tub. Yay!


So here we are at the door, looking in. Don't mind that pesky piece of trim in the corner that I keep forgetting to prime.


The trimmed out new/old window ... filled and sanded to within an inch of its life by yours truly, by hand, looks positively spiffy. (I have not included a photo of the literally 15 different hand sanding blocks I tried out while sanding down the wood filler, mostly because I was too tired to think of taking one at the time.) 

Thank you, Dan, for taking the time to save my window. You were one of the few people willing to see my little vision. 


The sill, which literally took two entire days of sanding and re-filling and sanding again, shiny and smooth.


Looks like new, yet retains its character. I didn't paint the actual windows or muntins, just the part of the frame we trimmed out. 

Oh, and I forgot to mention the three trips to Benjamin Moore, on the final one of which I had to (almost) stamp my foot to get the color matched exactly to the existing trim. The very young salesman says plaintively, "but, ma'am it can't be perfect." "Yes it can," I say, fairly calmly. "I expect it to be perfect." 

And perfect it is. (Though I do still have to pull apart the storm window, and sand, reglaze and paint that. Not looking forward to that one right this minute.) Any way.


The floor ... made by  Dan Brennan.


And honestly, I think the rest speaks for itself. Even the little fishes.


Yay! Yay Yay!


Wednesday, January 23, 2013

Porch Column Bases 7: Finishing Touches

The last steps remaining to be done were the final caulking, filling and painting of the four columns whose bases we replaced, all described in the first six posts titled "Porch Column Bases." The previous post is here.

Before I tackled the final touches, I photographed a bit of damage that happened to the tops, either when we removed the bases and left the columns hanging, or when we repositioned the columns on the new bases.

I don't know exactly what happened, but when we went to put the new bases in place, and line up the columns, there were slight differences in positioning. I don't know if our eyes don't see the same straight line, or some of the columns were out of plumb before, or are now, or what, but when we lined up the columns on the new bases, there were slight shifts of emphasis, and cracks developed in the tops of the bases, where they attach to the porch roof beam. I photographed these and then just painted them shut. Will have to keep an eye on them for any additional shifting.

I mention it, because I think this is another area where we were lucky. The tops were as secure as the bottoms, and never detached while we were working on the bottoms. But I would suggest you check that, as you're taking off the bottoms. We just kind of took it for granted and got lucky that all the tops stayed in place.


Another thing that developed was a crack in the paint on the beam that runs the length of the porch (you can see it faintly here, right above the porch column capital). This beam is spliced. Again, we're lucky everything held together and again, I'd suggest you try to determine whether the beam is spliced or at least keep an eye out for it, when you're pulling everything apart.


In any case, a day or two after we nailed everything down, I went around and made sure all the nails and screws were countersunk enough, and then filled all the shimmed up gaps and countersunk nail heads and screws  with wood putty. In this case I used a pre-mixed, fluffy putty that was easy to apply sideways, and stayed put when I pressed it into the shimmed gaps. I'd had enough of epoxy oozing out of gaps, and also didn't see the need to use epoxy for this job. I hope I was right about that decision, long-term.

After the putty dried, I sanded it lightly, vacuumed everything up and then caulked the columns where they meet the bases and the bases where they meet the porch floor. 

Here are some close-ups and some longer views of the whole ball of wax after puttying and caulking:


Then I taped off the bases and started painting. That part went blessedly fast. Fall was well advanced at this point, the days were getting short, the day was one of those soft grey, pretty fall days, and I was glad to have an easy outdoor job for once, and even more glad to be done by nightfall.


To see before and after shots, the next and final post in this series is here.