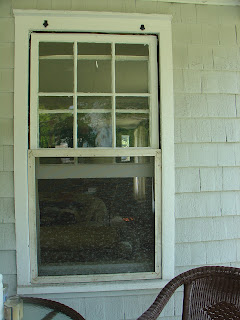
This post is introductory, and covers the materials needed. To go straight to construction, go here.
In the early part of last summer, just when it started to get uncomfortably hot, we finally got off our asses and decided to start making screens.
The house has all but two of its original windows, complete with wavy glass, ancient signatures and mysterious etchings from earlier inhabitants. The windows on the gable ends had aluminum storms and screens installed at some point, and the windows in the additions at the back of the house are newer, so fourteen of our thirty-seven or so windows do have screens. Still, a total of twenty-two windows have no screens, or, as I was to learn, nothing that I recognized as "screens" at the time. There's, like, no cross ventilation, especially upstairs under the eaves.
I'd actually never seen wooden storm windows before, and one of the most compelling things to me about the house, when we saw it for the first time, was the wealth of original windows. The last owners, Martin and Marguerite, must have gone out of their way to keep and maintain them, and it's something I too am absolutely determined to maintain.
Still, not having screens for cross-ventilation is a major problem in an era of global warming, especially when one has cats. And at first, I didn't think there would be an easy solution. But buried in the basement, the first summer when I went through its contents, the summer before last, I found some old screens in wooden frames. Wooden screens! I thought. How about that.
There was a baker's dozen, a very odd assortment, and so I brought them all up one day, trotting around to each window in turn, holding up one and then another. Ultimately, I found three that fit existing windows, though they fell out when I put them up. It didn't seem that they'd been put in for a very long time, if ever; there was no hardware; and I had no idea how to install them. Finally, in desperation, I just nailed them in.
Here's one from that first summer, nailed into the bottom half of a window:
I knew, from the first, we'd have to have more than three screens. And while the three we have work well, I also knew we'd have to figure out what hardware to use to attach and detach them easily, year in and year out.
After much hunting around online, and seeing no mention of wood screens anywhere (someone should write a blog about this, was one of my thoughts!), I decided that we'd have to make our own, using the existing ones as a model.
Turns out to be fairly simple to do, though I think it will be complicated to describe. Still, the basic steps are to make a frame, pretty much like a picture frame with a few minor modifications; install the screening; and then find a way to fix the thing to the window.
We're complete newbie DIY'ers and we managed to make two of them in the midst of multiple projects this past summer, so take heart if you are reading this, like your old windows, and want screens--keep going, you can do it!
First things first, so in this first post, I will review the materials needed to make a wooden window screen:
Materials Needed:
- Paint-grade lumber for the frame. We used size 1-3/4" x 3/4". We're using poplar for the first story front windows underneath the front porch. It'll paint better than pine, and seems to work fine if the screens are only up during the summer. But I've been doing research in the meanwhile, and learned that poplar can degrade and warp faster than pine, so it is probably worth going with a good grade of pine, to get the longest lasting results.
- Trim, to fasten the screen to the frame: 1/2"x1/4"
- Top brace lumber, 3/4"x1/2"
- Wood glue
- Dowels, corrugated fasteners or some other appropriate fastener, to secure the miter joints
- Screening
- 1/2" finish nails, to fasten trim
- 1" finish nails, to fasten brace
- Primer and paint
- Fasteners to hold screen to window frame. There are various solutions for this, which I will cover in a later post. Turnbuttons will work, seem to be period appropriate, and are readily available. I'm using screen and storm window retaining clips from House of Antique Hardware, an online shop.
Tools Needed:
This project also requires a few tools beyond the usual hammer and saw, including a table saw, drill, and miter box or miter saw, as well as some way of clamping glued miter joints.
A Note on Lumber:
This project also requires a few tools beyond the usual hammer and saw, including a table saw, drill, and miter box or miter saw, as well as some way of clamping glued miter joints.
A Note on Lumber:
Finally, note that before buying lumber, you will have to measure your windows to figure out how much lumber you need. I will cover that in the next post here.
____________________________________________
For
the entire series on making wooden window screens, click on the category
"How to Make Wood Window Screens Series", in the Topics list along
the right-hand side of the home page. There is also now an index tab at the top
of the home page, listing all the posts in sequential order, with a link to
each one.

Hey there Sherry! Thank you for sharing your thoughts about how to make window screens, it would be great if you have video or step-by-step image in how to make window screens. I still glad and proud follower of your blog, keep it up Sherry looking forward for more of your posts!
ReplyDeleteThanks,
Nancy
Window Planet for Superior Quality Windows and Doors in Toronto