At the same time, we'd just spent our savings to buy the house, put on a new roof, and put steel structural supports in the basement, and we just didn't have the money yet for the bath. We knew we'd have to pay a contractor. This room was never going to be a DIY room for us. We have no ability to take up floors and sister joists and lay tile, plumbing and electrical, etc., etc., etc.
So, we needed time to save, and I figured that I could do the design. It would save some money, but more importantly, I had no idea how we were going to solve the major issues, and I figured I'd have to sort that out slowly, over time, learning and feeling the house around me--something no designer could do. Read post "Problem Bathroom: Bathroom Project 4" here to catch up on the issues: awkward shower, slanted ceiling, slanted floor, small footprint, and--I forgot to add--the room is flanked on either side by staircases, so there is no room to expand. So there was all this churning in our heads from Day One.
But there was a point, where we started to put pen to paper. The first sketch was a crude drawing of the current room with major elements and a few measurements. Here you can see the tub and tile shower in the upper left hand (NE) corner, toilet in the lower left (NW) corner, and vanity along the right hand (S) wall. There is a window in the exterior (E) wall, on the right hand side, and a door leading to the hall on the opposite (W) wall, also on the right hand side of the room. The room is 8'6" square, and about 3' into the room from the door, the ceiling starts to slope to the exterior knee-wall, which is just under 5' high. These are the major elements that define the room.
Here is the first drawing:


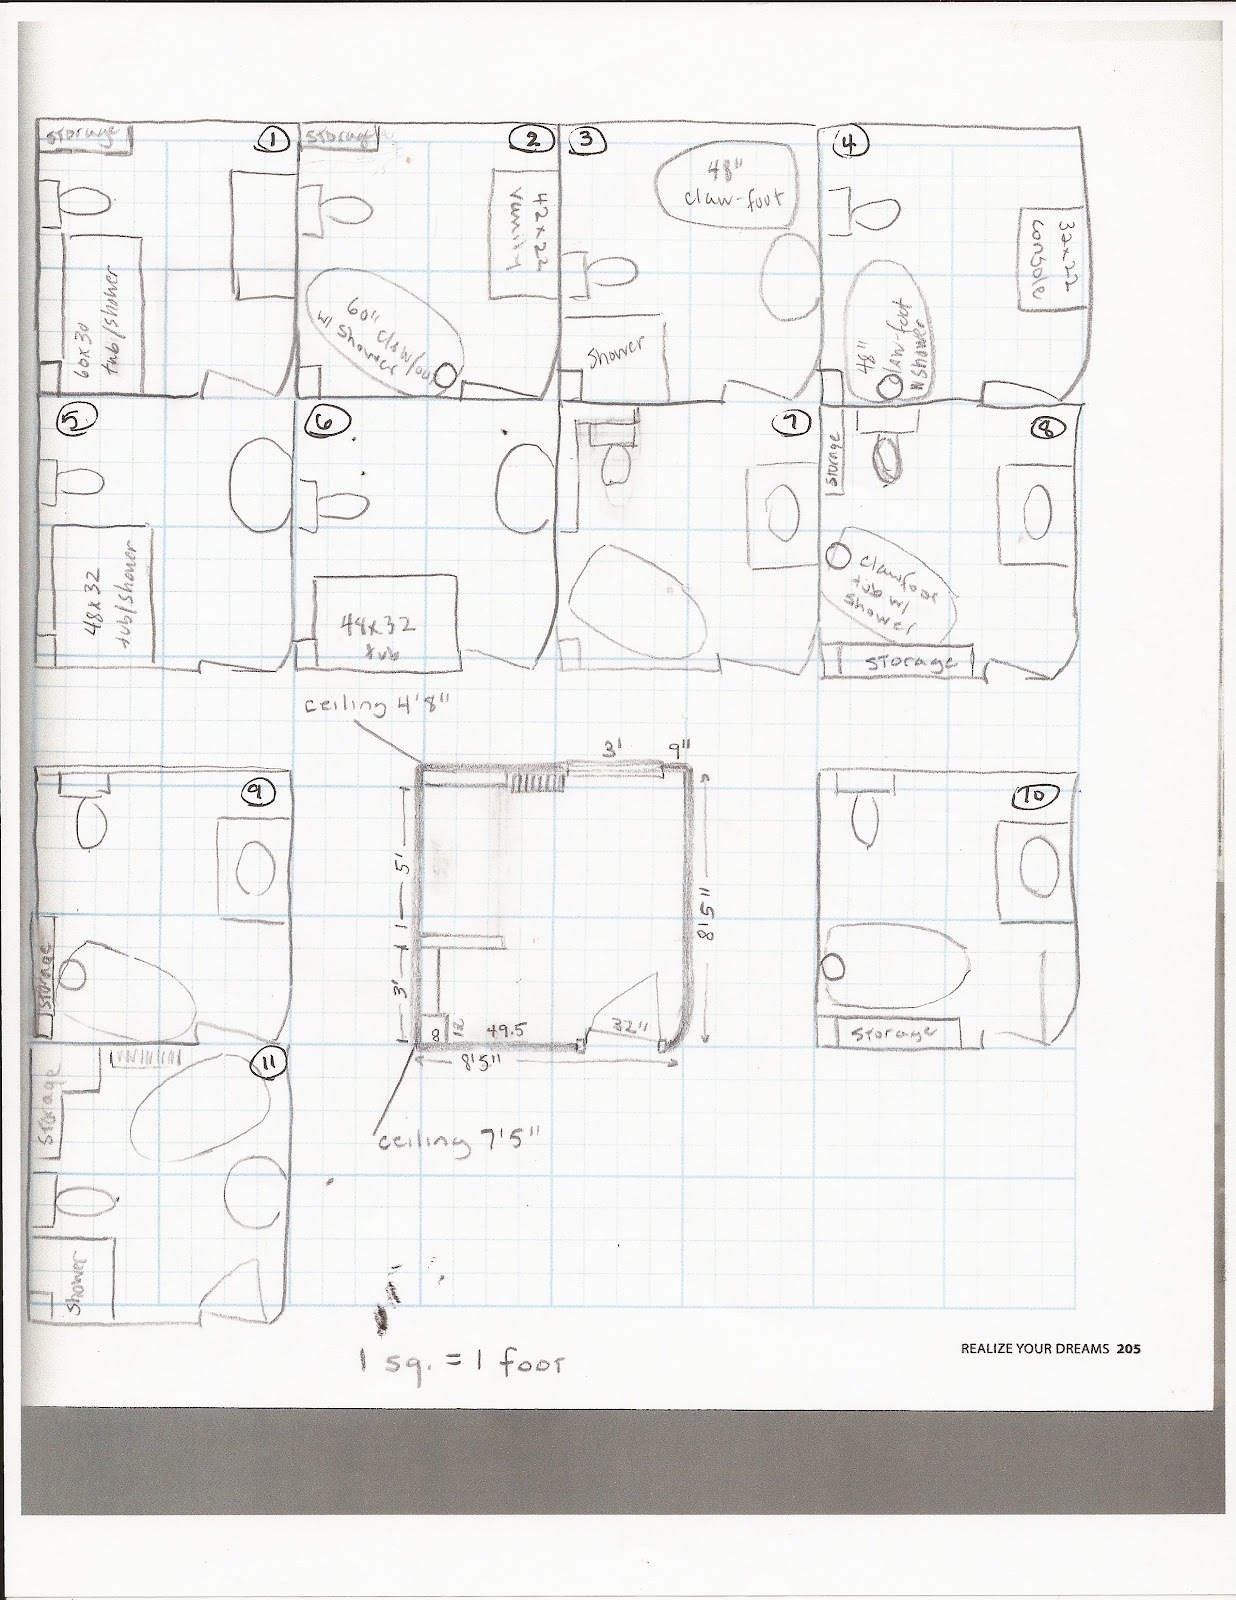
Then we started playing with options. I'd gone out to Barnes and Noble a couple of times, and hunted up all the books on their shelves about bathroom design. In the back of one was some graph paper and basic elements like tub, sink, toilet, to scale with measurements. I knew from the start that a 60" tub would be the largest we could do, so these early scale components were very helpful, because I could move them around. Here you can see an empty room to scale in the middle of the page, and then around, little thumbnails with the major components in different configurations.
On the upper left, you can see my first concept, which was just to flip the position of the tub and toilet on the north wall. At that point, I still hadn't thought "clawfoot." But in the second thumbnail, you can see the clawfoot idea emerge. And in fact, even though I drew another 10 thumbnails in the intervening weeks, it was that second idea that stuck.
I did buy design software. But it turned out to require a major investment of time just to learn the software. In the end, as you can see, I stuck with pencil and pen drawings on graph paper. It was just more expedient.
This was also the point when we first started talking to contractors. The first meeting we had with a contractor, the only documents we had were the three drawings above and a very rough, rough scope, basically a list of things to be done in the room.
It was the first contractor who added a very important limitation to our design. The toilet, he said, could not be moved across the room next to the sink (one of my first ideas), because that would mean boring through all the joists to get the drainpipe across the room, not a good idea in any house, let alone a house that is approaching 200 years old. And the drainpipe can't be brought up from the basement directly to the south, sink wall, because the hall and stair is below it--besides the fact that the cost then would be prohibitive. So that meant committing to keep the toilet on the north wall, where the main drain is, a major limitation.
I've never had any training in design, but I'd taken a graphic design course in my sophomore year in college, where we did thumbnails. The basic idea, which still holds, is to do as many thumbnails as you can possibly think of, very rapidly. Then go back and choose a few to scale up full size. So that's what I did. I drew a scaled-up drawing of the empty room, here:

And went back to the thumbs and chose the best one to show full-scale. We were still just flipping the relative positions of the tub and toilet, but I'd turned both the tub and toilet, placing them on the west and east wall, respectively, again on the advice of the first contractor.

By this point, we'd looked at so many design books and photos of contemporary bathrooms, and spent enough time with the scale drawings, that I realized the shower was going to be an issue. Because of the sloping ceiling, there wasn't any way to get a typical late twentieth-century full-size tub and tile surround plus a toilet on that north wall of the room.
Running it along the west wall ran it plumb into the door jam. And I didn't want a room where you'd be entering with a wall immediately to the left of the door, which a tile surround would necessitate. And ceiling height over the toilet was a huge issue. No matter how you place it, in the NE corner, there isn't more than 5' 8" inches head height over it. Not enough.
I started toying with the idea of an custom glass-enclosed tile shower stall in the NW corner, which you can see here. It moves the toilet into much better position for head height. And, because the house has to have one tub and because I like to take baths in the winter, I crammed a 4' clawfoot tub in front of the window in the SE corner.
So, these were the first two options we put out for bid. Option A with a custom tile shower and tiny 4' tub:

Option B with the original arrangement I was still holding onto, showing a clawfoot tub on the west wall and indecision about the toilet placement.

As we both realized that a late-twentieth-century tub with tile surround was just out of scale to the room, we'd become really drawn to the open feel of a clawfoot tub with an old-fashioned freestanding shower surround. Here was perhaps the first picture that drew us in:

There are lots of photos of bathrooms with clawfoot tubs at the moment. Unthinkable 30 years ago, but a huge trend at the moment, perhaps propitiously for this house. Even though it wasn't built with a bathroom, obviously, its first bathroom probably looked more like the above than its current state. So we really started to be attracted to the idea of a clawfoot tub and shower combination in our attempt to keep to the spirit of the house.
Also, at this point, we'd realized that Vintage Tub had the most user friendly website and the best selection of clawfoots, as well as its own very affordable brand, Randolph Morris. So, as I've described elsewhere, we took a trip out there to stand and sit in a few tubs, precisely to figure out if we could live with a contraption like the above photo. We did also visit every other showroom nearby, to look at toilets and sinks, but none of the showrooms had more than one clawfoot tub on display, and they were always the 6' length, hard to imagine scaling down to our 5' space.
Another thing we did was to go upstairs to the bathroom with a roll of masking tape and a measuring stick, and we stuck tape all over, trying to outline the components of the two layouts.
And then, the first bids came in.
This combination of stuff made several things clear. We couldn't afford a custom tile shower. It added another $7K to $9K to the job, and besides the 4' tub was unthinkably tiny. At Vintage Tub they use the 4' tub as a desk! Cute, but really. And we have to have a tub -- this is the only full bath in the house at present. So that knocked out Option A.
Standing in the shower surround at Vintage Tub, I realized we could do it--I'd been afraid it would feel too flimsy and claustrophobic. And it still might. But basically, we both felt we could live with it. So, that was how we finally settled on the clawfoot tub and freestanding shower surround as our solution.
But, doing measurements upstairs in the bathroom made me realize more acutely that the head height issue with the toilet was real. We measured out the toilet, and Capel couldn't stand in that spot in the NE corner with his head up. Even a few inches made a difference, I realized. So, it occurred to me, we could angle the tub and get just that few precious inches to move the toilet under a slightly higher ceiling. Here was the concept that finally stuck:

So, from that point on, the placement of major elements was pretty set. And then we started narrowing our search to actual pieces, so that I could draw the major elements with exact dimensions to-scale. This was an early version with specific appliances: a 61" Randolph Morris claw foot, a Toto toilet, and a 32" Randolph Morris console sink. This is basically the design we're implementing.

In the next post, I'll show how we fleshed out the designs to final drawings.
The design look exciting looking forward for finish project Sherry. Happy Holidays!
ReplyDeleteThanks,
Nancy
Window Planet uPVC windows – Superior Quality Windows and Doors